![]()
EK Honda Civic 96+ CX/DX/HX/EX, SiR, Si (Canada)
Articles and Writeups:
* "Finally" ScottDR's 96 EK Hybrid Story
|
by Lawrence Hwang
|
|
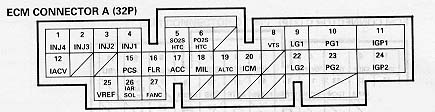
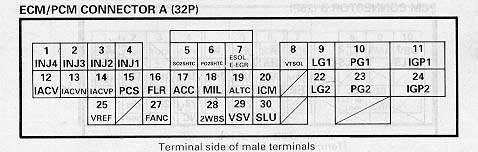
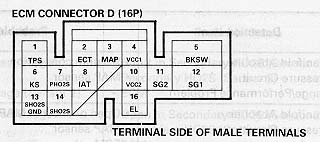
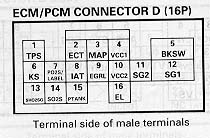
A Word of Advice 1996+ models are all OBDII compliant and the law only permits same year or newer engine hybrids. If you want a reliable hybrid just like how Honda does it (ie. JDM EK4 SiR, EK9 Civic TypeR, USDM Civic Si) then stay with OBDII. Trying to go OBDI will require some serious work including endless wiring problems as well as check engine lights if not done right. In short, don't mess with it unless you really know what you are dealing with. Other than ECM/ECU plug differences, OBDII engine basically has an additional O2 sensor behind the cat and a crank fluctuation sensor located near the oil pump. Also, DO get your engine, transmission, axles, wiring, ECU, engine mounts, shift linkage... from the SAME car if you can. There is always something else that you need even if you buy a "complete swap". So pump up your love for the sport and prepare for the worst. Engine Choices Surprisingly, EKs are as good of a hybrid choice as the EGs. Despite the cost, everything is plug n' play. With the increasing demand in DOHC VTEC engines, we are facing more choices than ever. If you live in California, smog check is inevitable. Getting a USDM (United States Domestic Market) engine will save you a lot of trouble - at the very least get the USDM block. For other lucky enthusiasts from other states JDM (Japanese Domestic Market) engines will give you a little more power right out of the box. Be sure the buy the ones with no water in it. Please look up the engine specs from the swap info page on Hybrid for further details. 1. JDM B18C Spec R/USDM B18C5 Frankly, we will always quest for more power no matter which engine we start with, so starting with 1.8 will save some regrets in the long run. Because EK weighs a lot, a similar EG swap may be a little faster. What You Will Need (From the donor car) 2. Transmission 3. Axles 4. ECU 5. Engine wiring harness 6. shift linkages/shifter 7. motor/transmission mounts - you will need a 99+ USDM Civic Si rear upper mount. 8. Exhaust manifold 9. Catalytic converter 10. Del Sol VTEC/99+ US Civic Si A/C mounting bracket 11. Helms factory service manuals. The SWAP You will need an engine lift to do the swap. If you have the cash, dish them out and have an engine put in your car. If not, or if you just want to enjoy the physical swap, rent or borrow an engine lift. Do not plan to finish a swap in one weekend. I gaurantee you that some thing will come up and you will have to walk to work. Have a second car ready if this is your daily driver. Make sure that you have 99% of what you need before pulling anything. Frankly, with your Helms manuals, you really don't need my amateur advices here. Just follow it carefully and you are all set. Basically DO this: ( I am writing from the top of my head, so correct me if you spot anything ) - Jack up the car, put it on jack stands. Now, for the details, Helms will tell you. I can only tell you that everything fit like factory. If in doubt, please visit your local Honda dealer and pop a hood of a 99 Si and compare your engine against it. Wiring I guess this is where all the problems are. If you don't have Helms... Forget it, pick up a copy before you start. Basically, you use what you have, add what you don't have and change the plugs to the GSR plugs if your EK plugs don't plug in. Do verify each and every plug for their functions and connections. You are learning what the car needs and this will make trouble shooting a lot easier. After messing with the wiring, do a test fit on the DOHC engine before droping the it in. Example: 1997 EK with 1997 USDM GSR B18C engine. You should see this from both your OBDII EK ECU as well as GSR ECU. The above B plug is here on denoted as C.
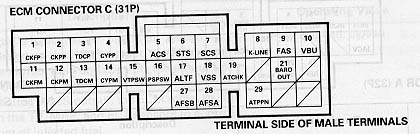
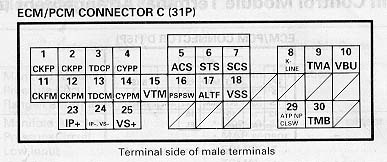
Now, let's look at plug C. The reason it is C is that there is a plug B which is used for automatics, which, we should never get involved in. Pin 1 and 2 are the specialities of OBDII, CKF sensor. If you don't have this, you are messing with the wrong wiring harness. 1-18 looks the same. 19 is for automatics. 21 is light green for the barometic sensor. Frankly I don't remember what I did with this guy. If you know what it is, please let me know. 27-29 on the GSR ECU is for the automatics. So there, nothing for you to do except to plug it in.
For the D plug, 1-5 are the same. 6 is the knock sensor. Again if you have DX/CX, add a wire. The rest are all good. Just plug it in and you are set for the ECU side. The engine side is more of a pain than the ECU side. The reason being that GSR uses a different style of engine harness. EGs are straight plug in from the engine side, but for the EKs, it is easier to use your existing engine harness and modify as needed. Cool Things I Learned 1. Running a straight pipe is illegal. But if you are going for a track event, pick up a DX after market cat-back exhaust for your EK hatch back. Connect it to any GSR header and it will bolt right up without the cat. 2. Notice that sorry little thin radiator in your EK? Don't worry, pick up a stock 96+ Automatic model EK dual core radiator. Cut off or just forget about the ATF bypass down there and you got yourself some cheap, geniune honda sports radiator. 3. Want to rub your EK the TypeR way?... Well DC2R suspension components BOLT up. However, I have heard that integra shocks are little longer than EKs... I need to look into that. |
|
|
|
|
|
|
 Before you read beware that I am a first time tech writer. I am simply sharing my experiences and will appreciate any comments. I am not responsible for anyone and/or their properties as a result of reading this page. So please bare with me and here we go...