![]()
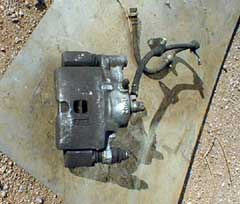
| The standard brakes on the 88-91 Civic hatchbacks are 9.5
inch disc brakes for the front and 7 inch drums for the rear. The 90-91
Civic EX 4 door sedan came equipped with the same size brakes as the 90-91
Acura Integra, 10.3 inch front discs and 9 inch rear discs. By replacing
the front 9.5 inch rotors with the 10.3 inch versions from the EX, a significant
increase in braking capacity is obtained. These brakes will be better able
to handle increased speeds and repeated hard braking without fading due
to their larger size and heat shedding capability. See photos for a comparison
of the caliper and rotor sizes.
|
|
 |
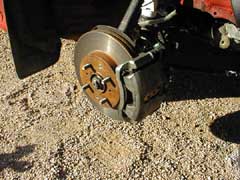
The conversion from the standard discs to the EX discs is simple; replace
the steering knuckle, rotor and caliper from the standard model with those
from the EX.
The process is straightforward and only requires simple hand tools,
including a ball joint separator. Follow along for better braking.
|
| Buy a Honda Service Manual from Helm. 1-800- 782-4356 Obtain
the necessary used parts from an auto recycling center, formally known
as a wrecking yard.
You will need the following pieces;
CAUTION--THE BRAKE CALIPERS ARE A PAIN TO REBUILD. I'VE BEEN DOING BRAKES FOR 20 YEARS AND HAD TO TAKE THEM TO A SHOP TO GET THE DUST SEALS REPLACED. SAVE YOURSELF THE TIME AND AGGRAVATION AND DO THE SAME. YOU'LL THANK ME IN THE MORNING. You can use the existing brake hoses, or better yet replace them with
new hoses, either the original rubber type, or the new stainless steel
braided hoses. The braided hoses will give better feel through the brake
pedal and will last forever.
|
|
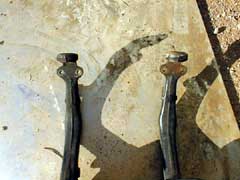
| When you buy the steering knuckles, compare them to each other, they should be a mirror image. If either one does not have the exact same bend as the other it is possible it is bent. This is a problem when buying used parts. See picture and compare the top of the 2 knuckles, the one on the right is bent. |
 |
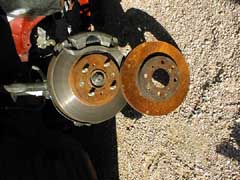
| I recommend purchasing new rotors since they are relatively
inexpensive and won't have to be machined for proper smoothness. If you
want to have an even better upgrade buy slotted/drilled rotors from one
of the many suppliers. You will need a hand held impact driver to remove
the rotors from the hubs. Don't try using a screwdriver, it won't work,
trust me on this.
You will need to remove the axle nut from the end of the half-shafts. Use a small chisel to move the staked part of the nut so it can be turned. The nut is torqued to 135 lb./ft. You will need a long breaker bar to get it loose. Make sure the parking brake is set because you may be able to move the car using a long breaker bar. You may also need to use a brace to keep the wheel from turning. Place a bar or something sturdy between 2 of the wheel studs and use the ground to stop the wheel from turning. Don't remove the nut until later. Next, loosen the lug nuts, but don't take them off yet. Raise the front end of the car and place it on jack stands. NEVER WORK ON A CAR BEING SUPPORTED ONLY BY A JACK---IT WILL FALL ON YOU AND HURT YOU!!! Finally, remove the front wheels, exposing the steering knuckle assembly,
rotor, and caliper.
|
|
|
Disconnect the brake hose from the caliper, brake fluid will spill on you. Wipe it off, but don't get it on the paint. Brake fluid eats paint. You will need to separate the steering knuckle from the upper ball joint, lower ball joint and the tie rod end. The ball joint separator can be used on all three. Once you have these apart, used a soft hammer (brass or lead) to push the axle out of the knuckle. You can also use a piece of wood to cushion the blows to the axle end. DO NOT HIT THE AXLE END WITH A REGULAR HAMMER-- YOU MIGHT DAMAGE THE THREADS. THIS MEANS YOU WOULD HAVE TO BUY A NEW AXLE. It shouldn't take much to get the axle to come out. If it won't loosen up after a few hits, use WD-40. Be careful to not pull the axle out of the transmission when you pull off the knuckle. The whole knuckle assembly should now pull off. It's heavy so don't let it fall on your foot, it will hurt. Installation is the reverse of the above. Just kidding. Replace the steering knuckle with the new one, but don't torque the ball joint or tie rod end nuts yet, just snug them up. Install the rotor if you haven't already.** Make sure you use the impact driver to get it tight on the hub. ** You can save time by assembling the rotor, caliper and pads to the knuckle prior to installation. It is more awkward to handle though since it's really heavy. You will have to use a hammer to push the hub onto the axle. Make sure you only hit the part of the disc with the wheel studs. Put it on just enough to get the nut started and use the nut to draw the axle through the hub. Install the caliper to the steering knuckle. Loosen the lower bolt holding the caliper to the mounting bracket and swing the caliper up to put in the brake pads. Retighten caliper bolt. Install the brake hose, remembering to put on both crush washers, one above and one below the hose fitting. Tighten the ball joint and tie rod nuts to the proper torque and replace the cotter pins. Repeat the steps for the other side of the car. Double check to make sure all nuts are tight and cotter pins in place. Replace the wheels on both sides of the car. Lower car to ground. Tighten lug nuts to 80 ft/lb. Torque the axle nuts to 135 ft/lb. If you don't have a torque wrench that goes that high, use a four foot breaker bar and tighten as much as you can. Make sure you stake the nut to the axle. Bleed the front brakes. Test for a firm pedal before driving. Make sure you break in the pads per the manufacturers recommendations. You'll be happy you did. |
|
|
|
|
|
|
|
|
(C) 1996, 1997, 1998, 1999 HYBRID Comments? Suggestions? Feedback? Send e-mail to: HYBRID editors |